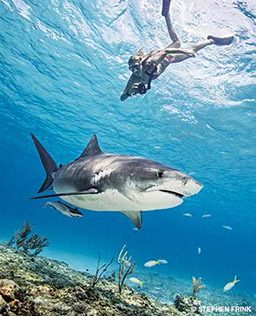
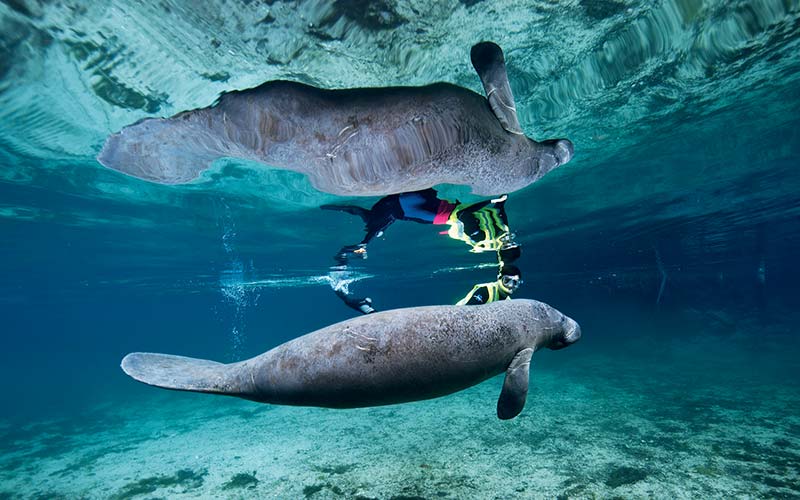
Underwater photography is certainly a more leisurely pursuit when diving with a scuba tank. There is time to compose, bracket, adjust the lighting, review the images on the LCD and do all the myriad little things to make certain the photo turns out exactly right. But some subjects are available only to the freediver — subjects such as the manatees in Florida’s Crystal River, which local regulations prohibit scuba divers from approaching. Or the subjects might be massive megafauna that move too quickly for an approach encumbered by scuba gear or a fragile, shallow reef where maneuvering into a tight spot around the delicate coral rules out the unforgiving bulk of a scuba tank.
Sometimes freedive photography requires feats of athleticism such as swimming to significant depths to get the shot. Of course, that’s only half the task, for the freediver has to make it back to the surface again. Freediving also bears the risk of hypoxia, also known as shallow-water blackout, which can be deadly. This is an issue DAN® researchers and physicians have written about often, and it’s why freedivers should always work in buddy teams.
The topic was recently addressed in the Expert Opinions article of the Spring 2013 issue of Alert Diver. In the article, Kay Tetzlaff, M.D., spoke to the effects of reduced oxygenation of the brain with repeated breath-hold dives, observing, “Extreme apneas as performed by elite breath-hold divers cause significant stress on the cardiovascular and respiratory systems. It should be noted that extreme breath-hold diving is a dangerous activity that can cause serious health hazards, among which long-term brain damage is the least worrisome.” That being said, I’m not talking about that kind of freediving in this article. Here I am focusing on freediving that’s well within the personal limits of the shooter and is intended to provide a way to photograph subjects not easily accessible by other means.

Dress for Success
While good fitness provides the biggest and most obvious boon to successful freediving, appropriate wardrobe selection is an easy way to improve efficiency. On a trip to Dominica to photograph sperm whales last winter I was surprised how few in our group had swapped their normal dive gear for more hydrodynamic equipment. Thick neoprene wetsuits that would keep a diver warm for an hour on the bottom provided too much buoyancy on the surface. The divers wearing these suits had to wear weights to even get below the surface, and so much effort was expended to defeat buoyancy that their dives were shallow, brief and tiring.
Some of the divers used fins that were likewise good for scuba diving but didn’t provide the immediate thrust and propulsion needed to dive under the water and get to speed quickly. Even accepting that we aren’t supposed to chase the whales, a barely perceptible fin motion by a whale or a dolphin grants so much more speed than even the fastest swimmer; to even have a possibility of a fleeting encounter requires powerful fins and good technique.
Low-volume masks that are easy to clear and provide minimal drag are best, and streamlined snorkels are definitely preferred. The snorkel in this scenario is for breathing on the surface; experienced freedivers will let the snorkel hang by the keeper during the dive (reinserting it on the surface) rather than keeping it clenched in their teeth the whole time. Some even tuck it away in their weight belt until it’s needed. Different certification agencies will recommend different techniques, but I‘m sure all would agree that streamlined gear makes for more successful freediving.
Many manufacturers now offer lines of apnea gear that include special masks, fins and snorkels as well as smooth-surfaced wetsuits that minimize drag while still providing thermal protection. Don’t assume that your familiar scuba gear is necessarily up to the task of delivering a quality freedive experience.
Fine-Tune Your Camera Gear
Bigger is not necessarily better in freedive photography. Many shooters are embracing smaller camera systems with less drag for this purpose. Compact cameras and housings are a fine solution if they don’t induce significant shutter lag. Capturing peak action on a breath-hold requires a system that will acquire focus quickly and be immediately responsive to the press of the shutter. Many large marine mammals are uniform in color, lacking the contrast that makes autofocus work easily, so advanced focus-acquisition technology is preferred.
The new wave of mirrorless cameras includes excellent options for freediving; the form factors of their housings are small, yet these cameras provide large sensors and capture excellent files without significant shutter lag. In his recent Shooter profile in Alert Diver (Summer 2013), Alex Mustard said, “Lately I have also been experimenting with Olympus’ two-times-crop mirrorless cameras, whose small size is beneficial in many areas (such as when freediving with pelagics) in the same way the Nikonos V was. The Olympus OM-D has such high image quality that I feel I’m not compromising on the final photograph, and I can simply get the camera places I can’t get my D4.”
That’s the legacy to which we aspire: the small size and convenience of a Nikonos V with a 15mm lens combined with modern, high-quality digital image capture. Many of the smaller housings for compact and mirrorless cameras along with their dedicated wide-angle optics have come a long way toward achieving that goal.
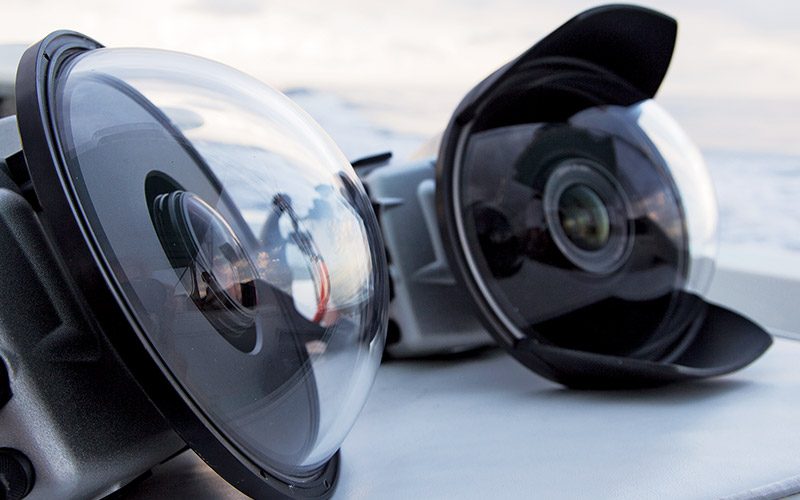
Buying new gear for an occasional freedive opportunity may not make sense, but you can make existing gear more efficient. One of the easiest adjustments is to remove sunshades from large-diameter dome ports. These shades protect the domes from scratching and reduce the possibility of flare in some lighting conditions, but the tradeoff is that they present significant water resistance. Swimming with them can sometimes feel like dragging a sea anchor. Some shades may not be removable, but most have a few screws holding them in place so they can be taken off. A mini-fisheye port will create less water resistance than a large-diameter “superdome,” provided the desired lens will work behind such a port.
Strobe Versus Ambient Light
Sometimes you’ll have no choice in the matter of “to strobe or not,” because certain animals are protected by regulations prohibiting the use of artificial light. These regulations may also restrict scuba, as bubbles can disturb some animals unduly. An encounter with the whale sharks off Isla Mujeres, Mexico, is an example of a situation in which strobe might help the overall image. It should be noted that the sharks are there to eat the seasonal spawn of little tunny, so the strobe might contribute unmanageable backscatter. But the sharks’ counter-shaded coloration might be better displayed with strobe light, and a little illumination inside the cavernous maws will reveal detail that would otherwise be shaded.
Other animals make the choice for you by moving so swiftly that leaving behind the strobe — with its additional drag — means the difference between getting the shot and being left in the wake. For the sperm whales in Dominica I opted to shoot with available light, as the days were sunny and the whales were most often near the surface (at least when we could see them). They can dive to 10,000 feet in search of prey, so strobes would be the least of my problems if I tried to photograph them at depth. Deeper than about 40 feet it was a hopeless pursuit anyway. While some shots were overly monochromatic without strobe, I felt that shooting available light was the best solution.
However, with the humpback whales in Tonga I sometimes found the strobe to be an advantage. The whales had brilliant white coloration on their sides, and the strobe helped with contrast, particularly with deep or backlit animals. The task was to find a strobe small enough yet powerful enough to do the job. Typically I would work at quarter power so I had a rapid recycle that could keep up with my motordrive for bursts of 10 frames per second, but to be effective that required proximity to the whale. The whale largely controlled that, and a friendly whale might benefit from strobe lighting. This is another risk/reward scenario: If the whale is too far away, the strobe will offer no optical benefit and will contribute water resistance. Bulky, buoyant strobe arms used to minimize wrist fatigue while scuba diving are the wrong solution for freedive photography because of their negative impact on hydrodynamics.
Shallow Water Seascapes and Over/Unders
In much of the available-light work I do while freediving I find that bracketing with strobe power and shutter speed (like I might do on scuba) isn’t particularly productive. In high ambient light at the surface it is sometimes hard to see the LED numbers that show camera settings and meter reading, and things happen so quickly on a single breath of air that a bit of camera automation is a relief. For this I find that the automatic setting in shutter-speed priority serves me well. I might dial in a bit of exposure compensation if my subjects are coming out consistently over- or underexposed. Even with strobe light I find this generally works quite well as my strobe power is set so low (to achieve rapid recycle) that it rarely overpowers the aperture required for the chosen shutter speed. If I bracket at all, it is likely with strobe power.
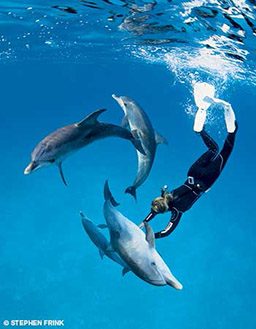
I had an issue with this protocol recently, however, while shooting snorkelers with spotted dolphins in the Bahamas. In the late afternoon, shooting with a shutter speed of 1/160 second to stop the action gave me an aperture of about f/8 for the ambient light. Working at 25 percent power on the strobe and ISO 320 gave me consistently good exposures. But as it got closer to dusk, the ambient light dropped and required f/4. Depth of field suffered, and the strobe would often overpower the foreground subject (typically the dolphin). My solution was to kick up the ISO to 640 and cut the strobe power to 12 percent, which brought the apertures back to f/5.6 or f/8 and provided exposures appropriate for marine life two to three feet away.
With over/unders or shallow coral-reef photography, shutter-speed priority with the sun to your back is generally a reliable way to shoot. If I want more color on a foreground subject or to light the inside of a model’s mask, I will add a strobe to the toolkit.
A Final Tip
There is nothing worse than freediving into a once-in-a-lifetime marine-life encounter and taking a few shots only to have your data buffer load up. It won’t take many instances of feeling like your lungs are bursting while you wait for the buffer to clear so you can shoot just a few more frames before you figure out that the $20 secure digital card you bought at Office Depot is not the right tool for the job. You’ll want the fastest and most efficient media you can buy.
With freedive photography you need to put it all together: mental and physical fitness, streamlined photo equipment, hydrodynamic water wear, optimal photo technique and a beautiful shallow reef or some other propitious environment for encountering significant marine life.
© Alert Diver — Q1 Winter 2014